
On a beautiful day, you suddenly see that the speed of your website is very slow and your day becomes very dark. Why and what to do? Do not worry, if you find a solution, your day can be bright again and the solution is to use the Autoptimize plugin. We will teach you how to use the Autoptimize WordPress plugin.
Why is your website slow?
There are several reasons for the increase in load time of your site, here are some of them:
- Your website has many databases such as media items, plugins and… they are very heavy.
- Server is weak
- Your website has a lot of traffic that makes it congested.
- Your code is too “large” and has too many unused characters.
- Your images are not standard and optimal
And there are many other reasons why your website slows down so much. In order to perform better, you need to find a solution. Using WordPress plugin is one of the solutions. There are many plugins that can help you optimize your website speed and Autoptimize is one of them.
How to optimize with Autoptimize WordPress plugin
The first thing you need to do, as always, is install and activate the Autoptimize plugin.

After preparing Autoptimize, you need to configure it. To access the plugin settings page, you can refer to the Settings »Autoptimize section. You can then view the plugin settings page.
In the following, we will explain each section to you.
JS, CSS and HTML tabs
JavaScript settings
With this option you can optimize JavaScript code. After checking this box, other options in the JavaScript settings will appear as shown below.

JavaScript code optimization: By enabling this option, you are actually enabling the reduction of JavaScript requests to make your website faster. This is the most important thing that can be done in this area.
JS file aggregation : Immediately after enabling the option, JavaScript code optimization is activated automatically. This practice is highly recommended. This is because when you reduce JavaScript requests, they will not be merged by default, so you will have to select entire JavaScript files to minimize them all.
Integrate JS inline : Also enabling this option increases the size of your cache despite faster page load. So make sure you clear your cache regularly because cache is not too good for your website. We do not recommend that option.
Load JavaScript in thetag : If you have problems with JavaScript components on your site and they do not work well, try the JavaScript option in. By activating this option, JavaScript is loaded first and common problems are solved by rendering the page. Otherwise, it is not recommended. This is because this page may prevent JavaScript from fixing the error, which slows down your site loading time.
Disable scripts from Autoptimize : You may encounter scripts that do not work well after the Autoptimize plugin has minimized or compressed it. In this section, you can enter this script and prevent it from becoming mini-WiFi by the plugin.
Add category by try-catch: Enable this option if a JS error prevents your pages from working properly. Enabling this option will prevent any errors before they can stop rendering the page.
CSS options settings
Now scroll down to the CSS options. There are options to check:
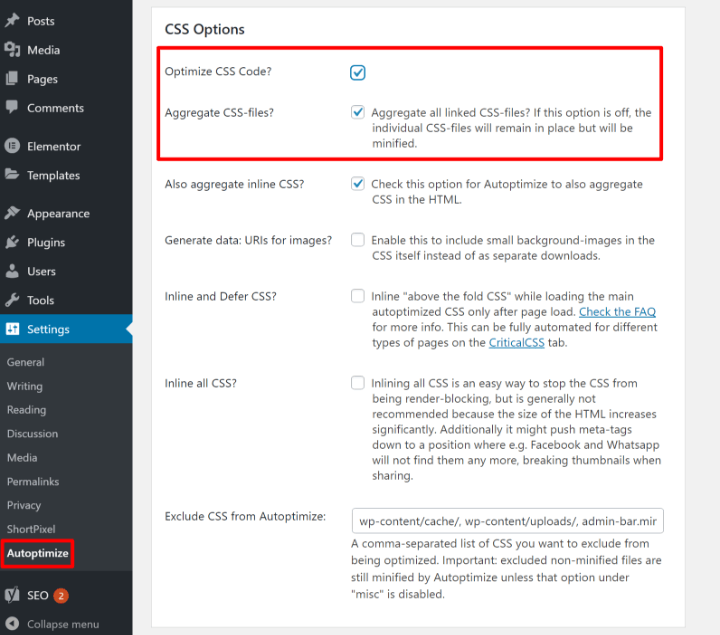
CSS code optimization, aggregation of CSS and inline CSS files are similar to JavaScript options. You should also enable inline CSS only if you know the cache is growing and delete it.
Generate data: URIs for images: This option allows you to encode thumbnails into CSS files and embed them. In this case, you will prevent many server requests to download each one.
Inline CSS and defer: This option allows you to insert some CSS into the HTML file if you need to load the page. Loading other CSSs is delayed and then loaded.
Inline all CSS code: This option is suitable for websites with low traffic. Incorporating all CSS will speed up low-traffic sites, but will work the other way around for high-traffic sites.
Disable CSS from Autoptimize: Here you can enter a list of CSS that the Autoptimize plugin is not allowed to access.
HTML settings and CDN settings

HTML Code Optimization: Enabling this option will remove white space and some HTML code from your website comments. This will make the code line compact to speed up your website.
Save HTML comments: Also enable this option if you want to save comments.
CDN Settings: Entering the content delivery network address at the root of the CDN URL is optional. If you have set up a complete CDN through each service, you can enter its address here. If you use Cloudflare, you do not need to do this.
Cache information : This section provides information about the site cache.
Miscellaneous settings
Slightly lower than the CDN settings there are miscellaneous settings.
Save integrated script and CSS as static files: You must enable this option. For some reason, disable it only if there is a compression or expiration error.
Minimize deleted CSS and JS files: If you did not delete any files from the JS and CSS options above, enable it, it means you are not shrinking any more files. It is optional.
Optimization for logged in users: By activating this option you can perform optimization for logged in users. As mentioned in the plugin description, you can choose it depending on your website or not. But if you use the page builder plugin, check this option to prevent some plugin functions.
After working with JS, CSS, and HTML settings, click Save Changes or Save Changes and Clear Cache.
Images
If you want to optimize your image for better performance, go to the Images tab.

Image Optimization: Your image is compressed by Shortpixel to make your website lighter.
Image optimization quality: Choose one of three compression levels.
Whether to load WebP in supported browsers: Enabling this option will load your images in WebP format as well as lazily. This can have a huge impact on speeding up your site.
Finally, click the Save Changes button.
Extra
If you want to make more detailed and additional options, go to the additional tab and select some boxes here according to your preference. The description of each section is quite understandable, so you just have to read it carefully. After making the settings, do not forget to click on the Save Changes button.

Optimize further
If you want to optimize your website, the author already suggests useful plugins in this list.
Critical CSS
Blocking CSS files slows down performance. To resolve this issue, the Autoptimize Critical CSS Power-Up plugin is recommended. Click the button on the page to install it. This is a special technique that first displays the primary and important CSS and then reloads the unimportant CSS later.

Now if you check your website you will notice that its speed has increased significantly. You can also use the site speed test tool for a more detailed review.
Final words
We hope you have learned how to optimize WordPress with the Autoptimize plugin. If for any reason you do not want to use this plugin, there are many other plugins to replace, including the WP Rocket plugin, which is one of the most popular and powerful tools to increase the speed of the site.


Leave feedback about this
You must be logged in to post a comment.